Jelly Baby Wave Machine

Libby has been working her way through the Physics IGCSE course from Sam Martell and got to the section about waves. There are some excellent resources (see my other article on YouTube Videos) out there but nothing quite beats building a wave machine to explore the motion of waves directly. We went to the Bradford science fair a year or so ago and saw something there that we just had to have a got at building.

first wiggleIt’s basically a long piece of duct tape with bamboo skewers stuck to it and jelly babies stuck to  the skewers. When you suspend the tape and wiggle one of the skewers at one end it causes a transverse wave to propagate down the line. The waves will exhibit all the expected behaviours just like any wave does it’s just in a non-conventional medium! It’s perfect for playing with waves and you can eat the jelly babies afterwards if you want. It was pointed out that you don’t need to use jelly babies and the at something more permanent could be used and that is true but it’s not as engaging as making science edible, in my opinion. So if you fancy having a go, try following these instructions and take a look at the video we made on youtube (links are all below). So onwards…


First your going to need some basic equipment:

  1. A roll of duct tape long enough to do twice the length you’re planning.
  2. Bamboo skewers
  3. Jelly Babies (more than you think! as some get eaten)
  4. 2 metal rods or thick wood dowels for anchor points at each end.
  5. Tape measure
  6. Clamp stands or some way of suspending it at each end.
Jelly Baby Wave Machine

Our pile of kit

Our pile looks like this on the right.

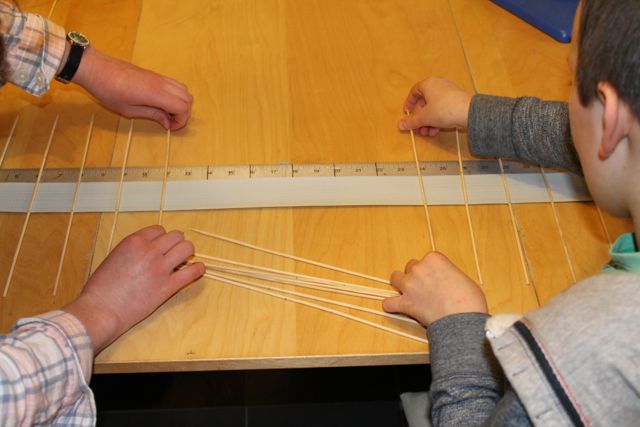
Start by laying out the skewers on the tape, 5cm apart. Mark the middle of each stick and make sure you line up the middle of the stick with the middle of the tape and keep them perpendicular tot he tape.

Putting the sticks onto the tape

Putting the sticks onto the tape

Do it alongside a ruler and when you reach the end lay another stretch of duck tape over t he top of the skewers to keep them in place. We used a second role of tape and kept them both running continuously.

sticks on the tape  

Alex and Libby kept at the layout of sticks

two heads


centering the sticks

Cassie worked on marking the middle of the skewers. We anchored a metal bar at both ends

anchor pointAnd when we were done the whole tape was 4.5m long. We then rolled it up to make hanging easier.

rolling up the tape

Then using a couple of lab stands clamped to the kitchen bench and table…

first suspension
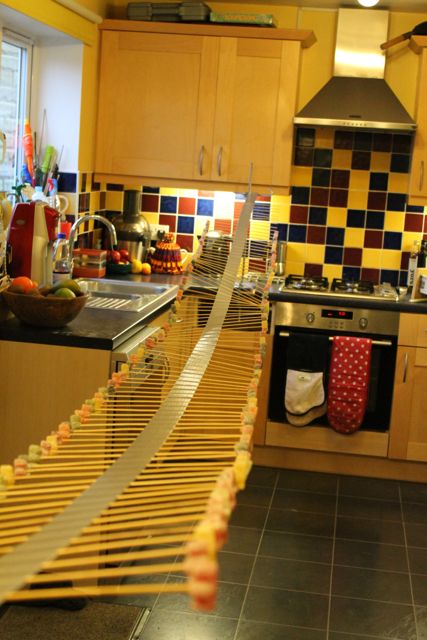
We loaded the jelly babies. As we did so we noticed that  not all jelly babies are the same and this caused the sticks to start to hang lower on one side than the other so we went for colour pairs, putting only the same colour sweet on the same skewer. This seemed to balance things nicely.

spearing the jelly babiesOnce all the skewers had a jelly baby stuck on each end your done. Make sure it does not sag too much by pulling the ends out a bit.

first wiggleAnd give it its first wiggle by moving the end of a skewer at one on up and down to start a wave. The tension and weight of the set up will only want to go so fast, so as long as you’re not brutal with it, you can send a beautiful wave down the length and reflection at the other end will send it back.

Finally we made a video of the machine in action. It’s here on youtube.

Jelly Baby Wave Machine 

So I hope you have fun making your own and do email or leave comments letting us know how you got on.

Marmalade time!

January means Seville Oranges which, of course, means Marmalade! Make sure you have a good sharp knife to cope with with the lengthy job of shredding the orange peel which is at the heart of a good marmalade. The job is always fiddly and best done with company, so Libby and I set to work. After much chopping and peeling and chatting all the peel, juice, pith and pips were simmering away into a suitable softness. If you’re after a recipe to try, give ours a go!

Seville Orange Marmalade

What you need

1kg Seville oranges

Juice from 2 lemons

4 pints water

2Kg sugar

What you do

Preparing the oranges
Cut the oranges in half and squeeze the juice into a large pan through a sieve to catch all the pips.
Using a spoon, scrape the pith and flesh from the orange peel and put to one side.
Carefully cut the peel into thin strips. The peel swells a bit, so remember to make them a little thinner, but it’s up to you how fine you like your marmalade peel.
Place the peel in the pan with the fruit juices and water. Tie the reserved pith, flesh and pips in a large piece of muslin to make a bag, and put this in the water too. This will provide the pectin for your marmalade to set with.
Bring to the boil and simmer for an hour or two, until the peel has softened, and the liquid reduced by about a half.
Remove from the heat and squeeze the liquid from the muslin bag into the pan. You can get rid of the pips and stuff now, you should have enough pectin in your mix.

Jam Pan

Add the sugar to the pan and stir to dissolve.
When the sugar has dissolved, return the pan to the heat and bring to the boil.
Boil rapidly until the setting point is reached, then remove from the heat, skim any scum from the surface and leave for 15 minutes before putting in warm sterilised jars. Seal the jars and leave to cool completely

Once the marmalade is boiling rapidly, it looks quite frothy and exciting. The only thing to consider is the elusive “setting point”. This is normally reached once enough water has evaporated to allow the marmalade to reach 105degC so the pectin is activated and will make the jam set. I have gone for accuracy in the form of a Digital Candy Thermometer, with a handy pan clip and an alarm as the desired temperature is reached. You can also test the marmalade for setting by putting a little of it on a cold plate and seeing if it wrinkles when you push a finger through it. In fact it is always best to try this even if you think the temperature is there, as sometimes you need to get the jam or marmalade just a bit hotter, so I put a plate in the freezer to cool too.

This combination has worked well for us, and we now have a years supply of yummy marmalade cooling on the counter.
marmalade making

Making marmalade in the fiveotherwise kitchen

Art awards and heatwave

By_the_wharfe

We have been working with a home education group in a local gallery to enter for the Bronze Art Award, which requires entrants to visit exhibitions, take part in art workshops, discover and describe an art hero and pass on art skills. All elements need documenting, and then putting together in a portfolio. Friday was an art workshop combining a couple of “passing on art skills” sessions with a check through portfolios to make sure everyone was nearly finished. Both girls are entering for the award so this meant a hasty run round collating pages and deciding on a book format for the finished product. Cassie had most to do, as she put off starting until after her recent exams were finished.

We also wanted to get it all done by Thursday lunch time so as to join another home ed family by the river Wharfe, for an afternoon of swimming in the heat! I had to sit on the bank with baby Sam, whilst Neale took the kids into the river, but we did get to splash our feet to cool down. Everyone had wetsuits, which allowed them to mess about in the water for longer, and it only took a little while in the sun before folk were hot enough for another dip in the cool river. Being able to take advantage of the quiet midweeks is a huge bonus of home education. We get quite used to visiting empty parks, museums and galleries, so that busy weekends and school holidays, when you have to queue for things, can be a bit disappointing.

The workshop also went well. It was hotter on Friday, but we were in the nice air-conditioned gallery then, and had the memory of the lush, sunny riverside to bolster us against the day in the city. Now the girls have a few weeks to finish their portfolios before our next session, and the hot weather goes on.

Doing My Exams

Exams_kitI have recently sat my I/GCSEs for Chemistry, Biology and Maths. It was a very different experience to anything I am used to, and I found that there was a lot of revision I had to do, although reading through a revision guide for each topic helped a lot, it reminded me of what I had already learnt. You don’t want to take ages over reminding yourself, but doing it in short sessions with quick breaks helps loads, so you don’t waste the time you have. I also did a lot of past papers so I could see what I had remembered and it meant I know what sort of questions and answers appear on most papers. Somethings I only know from doing the past papers. Writing out crib sheets on what you need to remember the most, to focus your last minute revision, is a good idea too.

Just before each exam I didn’t really feel nervous, not until I sat down and the reality caught up with me. Some people can get quite anxious about an exam, but it doesn’t matter what other people think, you just have to be calm and do your best. All the examiners involved were kind and willing to help. I was usually in the same room as a few A-level students taking their exams, so it was a bit quieter than being with lots of other students all dong the same as you. It is strange sitting an exam, especially if you have not been in that situation before. Every sound is magnified in the quiet, but everything going on around you is irrelevant, only your own work matters.

Now that I have finished my exams I do feel a sense of relief, but doing them really gave purpose to what I had been learning before. And now I just have to wait for my results!